Many times we need to refer to Git help or search for Git commands online. To make the process easier, I am creating a cheatsheet for Git commands.
Featured post
GIT | Cheat Sheet
Leave a reply
Many times we need to refer to Git help or search for Git commands online. To make the process easier, I am creating a cheatsheet for Git commands.
In this post I would be discussing about the popular way of testing i.e. Mocking. Lets see what is mocking, why is it important and how do we implement this using Moq framework in C#.
In SQL there are times when we want to check whether one of the column value is NULL or is not Null. Some might think as I thought that the direct comparison like = or <> would work.
Continue readingUsually when developing any SQL based system, we need some master tables which contains values and Ids which are consistent and same as enums in our code. But when you set an identity column in the table it would not let you insert the Id of your choice. So there is a flag which you can turn on and then insert the rows, and then turn the flag back off.
Continue readingRecently I faced a issue where when you try to connect to a database in an environment using EntityFramework, it gives you the below error:-
Continue readingThe server principal ‘someuser’ is not able to access the database ‘somedbname’ under the current security context.
Angular CLI is used to generate code/files for various things used in Angular like Components, Services etc. We would be discussing these topics in more detail in upcoming posts.
If you have followed my previous post, then you would have already installed Angular CLI, if not then please go to the post and follow the steps there.
Now let’s use Angular CLI to generate our new project. In order to understand Angular we would be creating one sample application which would be similar to IMDB(Internet Movie Database). For those who don’t know what IMDB is, it’s a site where you can find information regarding various movies, seasons, actors and also watch trailers.
Let’s name our application as MDB(Movie Database).
Now, go to the command prompt and create a folder named as MDB and go to that folder in the command prompt. I would be using command prompt or terminal interchangeably so for Mac/Linux users it means Terminal and for Windows users it means Command Prompt.
Run the following command to create a project.
ng new --directory .
ng is the command used which is angular cli, new means new project and directory parameter lets you choose which directory you would choose for files. ‘.’ means current directory.
It would ask for few inputs below, choose the following for now.
? What name would you like to use for the new workspace and initial project? MDB
? Would you like to add Angular routing? Yes
? Which stylesheet format would you like to use? Sass
For last option you can choose Sass, Css, Less or Stylus.
Once the command is completed, it would generate few files like below.
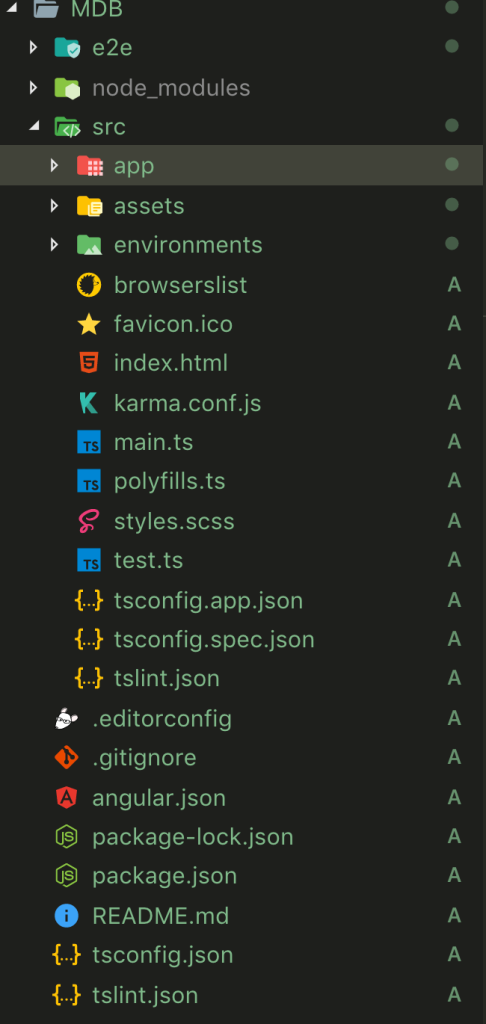
Now, lets examine few of the folders which are generated by Angular CLI.
1. e2e
2. e2e/src
3. node_modules
4. src
5. src/app
6. src/assets
7. src/environments
The folder e2e & e2e/src contains all the base setup files for running end to end tests. We would explore e2e tests later near the end of the series. End to end tests are run using protractor which are basically integration tests.
node_modules is created by npm which contains all the packages which we need in our project.
src & src/app are the main folder in which we would be writing our code.
src/assets is the folder which contains various assets, which you would need minimal in the initial stages of this series.
src/environments is the folder which contains various environments settings.
Now, run the following command to install all the dependencies needed by angular project.
npm install
It would take few seconds. This command would only work if you are running it under the folder MDB.
Now run the following command to run the application which is generated by Angular CLI.
ng serve -o
The above command would also take some time to compile the application and would open the browser and it would look something like below.
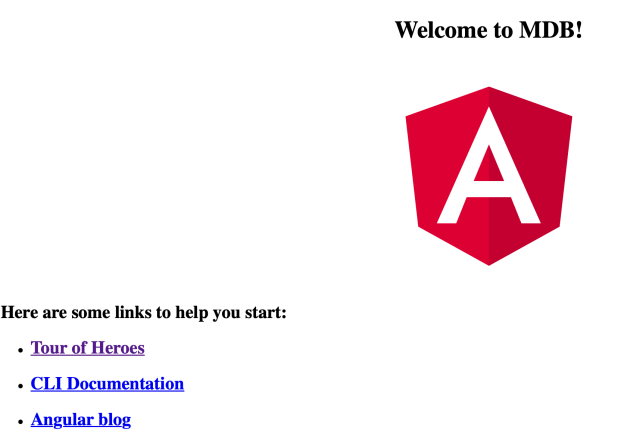
Congratulations! You have successfully setup the Angular application.
In this series of posts I would like to go in depth of Angular 7+ versions. This page is the index/table of contents page and would be updated as I add more content to this series and all the articles would be linked from here. All the topics which are linked have content and others which are not linked are in progress.
Some part of the tutorial would need Backend service, for which I would be using in memory web api npm module which provides an easier way to mimic the actual server which can be replaced with actual backend server calls of your choice.
I would be using VS Code editor, but you can code in any editor of your choice. I would also provide link to each coding exercise wherever necessary.
Below are some of the topics which I would be covering in this.
Please feel free to add comment if you like me to add additional content on Angular and related technologies.
Some pre-requisites for setting up development environment are:
npm is a node package manager which is used to install various libraries needed for angular and related libraries. In order to install npm we need to install node.js. You can download node.js from https://nodejs.org.
You can verify the node.js and npm by running the following commands in terminal/command prompt.
To check the node version, run the following command:
node -v
To check the npm version, run the following command:
npm -v
VS Code is a very light weight cross platform Code Editor which supports many languages, intellisense, debugging and lot of extensions to extend VS Code. You can work on any other Code editor of your choice as well if you want, but I would highly recommend VS Code as I have not seen any other code editor which is better than VS Code and is free. You can install VS Code from https://code.visualstudio.com/download.
Angular CLI or Angular Command Line Interface is a tool which lets you generate code using some specific command in terminal or command prompt. You can install Angular CLI using npm by using the following command.
npm install -g @angular/cli
The above command would install angular cli globally i.e. it would be available in any directory. If you want to install angular cli in specific project only, then go to that folder in terminal/command prompt and run the following command.
npm install @angular/cli
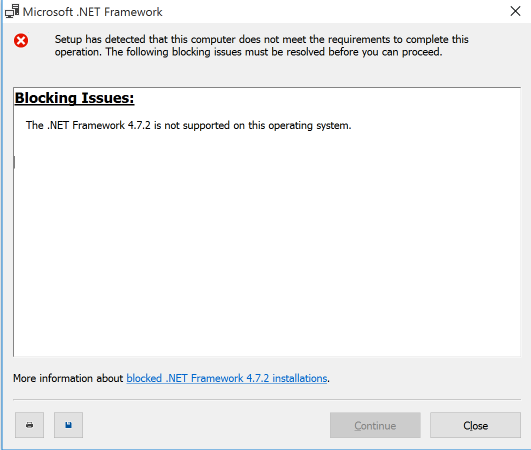
If you are installing .NET Framework 4.7.2, you might see error message like
Blocking Issues:
The .NET Framework 4.7.2 is not supported on this operating system.
A lot of times when we code, we have to code in shared code or modules which would be used by lot of people and we definitely don’t want something like that to break and affect lot of people.
Sometimes when you are coding in VS Code and you want to clean up node_modules folder, you either delete the files directly or you can run the below command in VS Code’s PowerShell terminal which is pretty handy.
ls node_modules | ForEach-Object { npm uninstall $_.name}
Hope this might be useful to some people who want to automate things.
